
uNLIMITED DIGITAL MARKETING SUPPORT AND TECHNOLOGY
Do you want access to the most powerful digital marketing solution available for your business? Unlock limitless growth potential with our comprehensive digital marketing solution and expert support
Fill out the form below to get started!
WHAT YOU'LL GET

Unlimited Support
Gain access to unlimited support coupled with expert guidance to navigate our marketing technology seamlessly. Never feel stranded again as our team stands ready to assist you at every turn.

Comprehensive CRM Integration
Easily centralize your contacts with our CRM integration, including automatic LinkedIn imports. Track interactions across all platforms for targeted engagement strategies.

Autonomous AI Agents
Deploy agents that go beyond chat to manage pipelines and trigger complex workflows. These digital workers execute multi-step tasks 24/7, ensuring no lead is missed while autonomously scaling your operations to meet every business goal.

Industry-Specific Snapshots & Prebuilt Tools
Our platform comes with pre-built, customizable snapshots by industry loaded with automations, templates, and tools so you have begin putting our system to work on day one.

Powerful Email Marketing Tools
Utilize our robust email marketing technology to craft engaging campaigns and automate follow-ups. Maximize audience engagement and conversion rates with powerful tools designed to deliver results.

Autonomous AI Engagement
Deploy 24/7 agents that handle complex conversations and lead nurturing. These systems autonomously sync with your CRM and execute follow-up workflows, turning inquiries into sales-ready opportunities without human intervention.

Limitless Marketing Reach with Funnels
Create unlimited marketing funnels and materials effortlessly with our intuitive interface and customizable templates. Scale your outreach efforts exponentially and capture leads with ease.
MARKETING TECHNOLOGY FEATURES
Social Media Scheduling: Schedule social media across all major channels and have unlimited recurring posts
CRM & Pipeline Management: Track leads, manage customer relationships, and monitor sales pipelines in one place.
Automated Follow-Ups: Create custom workflows for email, SMS, and call reminders to engage prospects effortlessly.
Smart Workflow Automation: Automate lead routing and pipeline updates using AI that triggers personalized follow-ups based on real-time prospect sentiment.
Custom Chatbots: Qualify leads and answer inquiries 24/7 with AI-powered chat solutions.
Multi-Channel Marketing: Run email campaigns, text messages (SMS), and social media ads from a single platform.
Landing Page Builder: Design high-converting pages with drag-and-drop tools and customizable templates.
Appointment Scheduling: Allow customers to book directly into your calendar with automated reminders.
Review Management: Generate, track, and respond to customer reviews to boost online reputation.
Payment Processing: Accept payments seamlessly through the platform.
Industry-Specific Marketing Tools
Our platform comes with pre-built, customizable snapshots ready to use.
Unlimited Integrations: Compatable with Make.com and Zapier for unlimited integrations and AI automations.
Call Tracking & Recording: Monitor call performance and record important conversations for training and analysis.
AI Booking Agents: Deploy autonomous agents to qualify leads and book meetings directly into your calendar via SMS and DM 24/7.
Analytics Dashboard: Access real-time reporting on campaign performance and business metrics, including advertising reporting via Meta and Google.
Membership & Course Hosting: Create and sell online courses or membership programs directly through the system.
Lead Nurturing Funnels: Build automated sequences to turn cold leads into loyal customers.
Unlimited Users: Add your entire team to collaborate without additional licensing fees.
Mobile App: Manage your business on the go with the iOS and Android mobile apps.
Dedicated Support: Get expert assistance to help you maximize platform features.
WHO IS THIS FOR?
This plan is ideal for any business owner or marketing team looking to elevate their marketing efforts to the next level.
Whether you're a startup seeking growth or an established enterprise aiming for expansion, our Unlimited Digital Marketing support and technology are tailored to meet your needs.
If you desire to upgrade your marketing strategies while having dedicated support every step of the way, this plan is perfect for you.


How to Build a Lead Capture Form That Feeds Your Pipeline
A form on your website is only half a lead capture system. The other half is what happens after someone clicks Submit. If a new inquiry lands in an inbox and waits for someone to copy it into a spreadsheet or CRM, leads get lost, follow-up gets delayed, and nobody has a clear picture of what's in the pipeline.
In MarTech by Ajax Union, you can connect those pieces so they work on their own. A visitor fills out your form, MarTech creates their contact record, and a workflow places a new deal in the right stage of your sales pipeline, ready for your team to work.
This guide walks through the full setup: preparing your pipeline, building the form, setting up fields so the data lands in the right place, creating the workflow, and testing everything end to end.
How the Form, Contact, Workflow, and Opportunity Work Together
Before building anything, it helps to know what each piece does. Four parts are involved, and each one hands off to the next:
The form collects the visitor's details, such as name, email, phone, and the service they're interested in.
The contact record is created automatically when a new lead submits a MarTech form. The answers they gave are stored on that record.
The workflow starts when the form is submitted, using the Form Submitted trigger.
The opportunity is created by the workflow and placed in the pipeline and stage you choose. An opportunity represents a potential deal, and the pipeline is the board that tracks deals through your sales process.
One point that's easy to miss: submitting a form creates a contact, but it does not create an opportunity by itself. The workflow is what turns a new contact into a deal in your pipeline. That's why all four pieces need to be in place.
Before You Start: Set Up Your Pipeline
Your workflow needs a pipeline and stage to send new leads to, so set those up first. If you already have a sales pipeline you're happy with, skip to the next section.
In MarTech, go to Opportunities.
Click Pipelines.
Click Create New Pipeline.
Enter a name for the pipeline and add your stages.
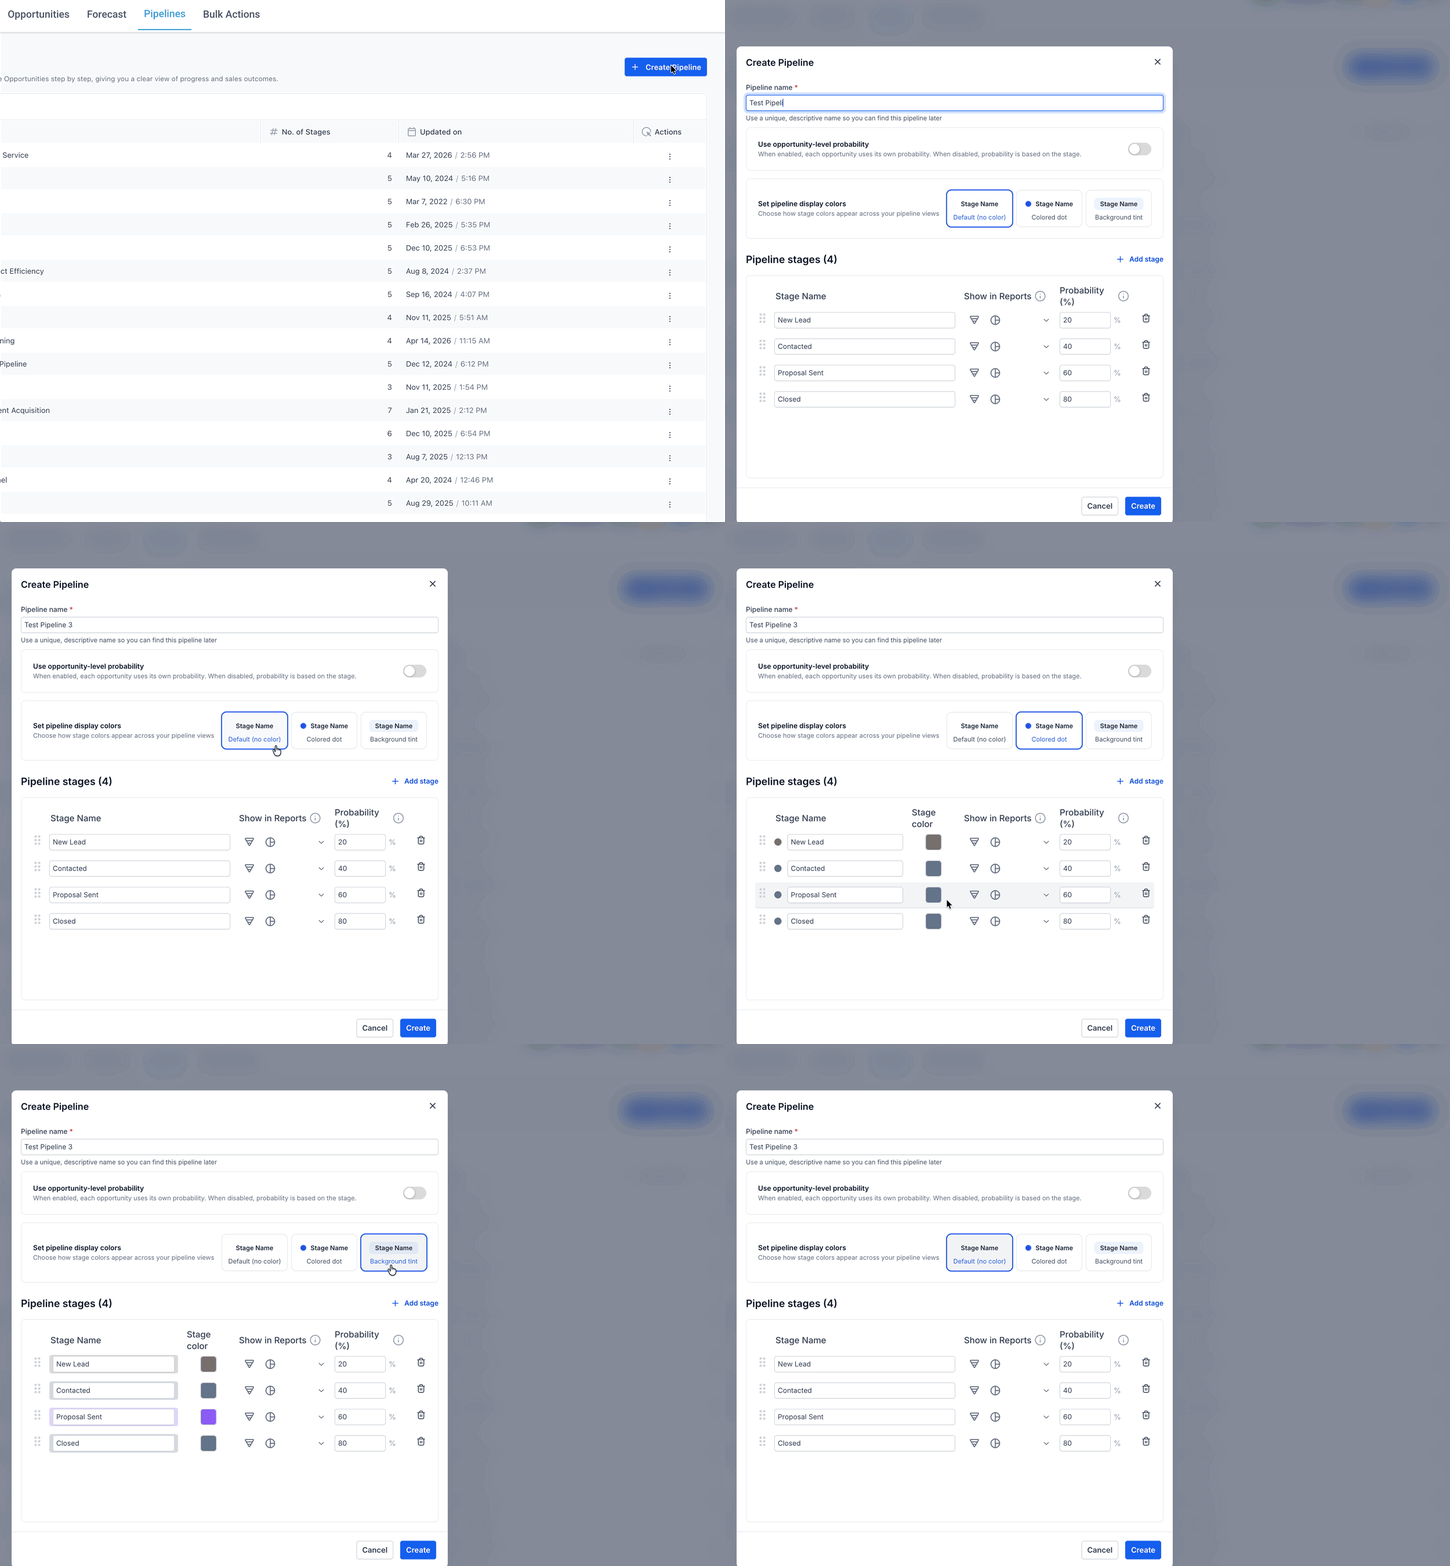
Click Save.
Your stages should reflect the real steps a lead moves through in your business. For a service business, that might look like:
New Lead
Contacted
Booked Call
Proposal Sent
Closed
The first stage is where form leads will land, so give it an obvious name like "New Lead" or "New Web Inquiry."
Step 1: Create the Form
Go to Sites → Forms.
Click + Create New Form.
Start with a blank form, or choose a template from the Template Library if one is close to what you need.
Use a clear, consistent name for the form, such as "Website – Quote Request." You'll select this form by name when you build the workflow, and a good naming habit makes forms much easier to find as you add more.
You can also create a form from inside the Funnel or Website Builder while you're editing a page. Forms created that way appear in the same central Forms list, and you can reuse any existing form on other pages.
Step 2: Add and Configure Your Form Fields
Start with the standard contact fields most lead forms need:
First Name
Last Name
Email
Phone
Then add anything your team needs to respond well. A Message field gives people room to describe what they need. Drag the fields into the order you want, and mark the important ones as required.
Keep the form as short as you can. Every field you add is one more reason for a visitor to give up before submitting. A good test: if your team won't use an answer in the first conversation, it probably doesn't need to be on the form.
Adding custom fields
When you need information that isn't a standard contact field, such as the service someone is interested in or how they heard about you, add a custom field directly in the form builder. You can drag these custom field types straight onto the form:
Radio Select
Single and Multi Dropdown
Checkbox
File upload
Single Line and Multi Line text
Textbox List
Date picker
Number
Monetary
For dropdowns, radio buttons, and checkboxes, set the answer options. You can also set the custom field's name and unique key. To change a field later, click it in the builder and use the General Settings and Advanced Settings options in the panel on the right.
Two things to know before you save:
Names and keys lock after saving. Once you save the form, the custom field's name and unique key can only be changed from Settings → Custom Fields, so choose them carefully.
Avoid the word "score" unless you mean it. A custom field with "score" in its name is automatically treated as a numeric scoring element in forms, surveys, and quizzes.
Saving the form saves any new custom fields, which makes them available everywhere else in your account.
Step 3: Make Sure Each Field Maps to the Contact Record
"Mapping" sounds technical, but in MarTech forms it comes down to one decision: which contact field each form question saves to. You make that decision when you choose which field to add.
Standard fields like First Name, Email, and Phone save to the matching fields on the contact record.
Custom fields you add to a form are contact custom fields, so answers are stored on the contact record as well.
Here's how that looks for a typical quote request form:
Form question | Field type | Saves to |
First name | Standard | Contact's first name |
Standard | Contact's email | |
Phone | Standard | Contact's phone |
What service do you need? | Single Dropdown (custom) | Contact custom field "Service Needed" |
How did you hear about us? | Radio Select (custom) | Contact custom field "Lead Source Detail" |
A few rules keep your data clean:
Forms work with contact fields only. MarTech has two kinds of custom fields: contact fields, which belong to the person, and opportunity fields, which belong to a specific deal. Only contact fields can be added to forms, so everything a form collects lives on the contact record.
A field's type is permanent. A custom field created as a contact field can't be switched to an opportunity field later, or the other way around. You would need to create a new field.
Reuse before you create. Check Settings → Custom Fields for an existing field before adding a new one. Duplicate fields with similar names make reporting and personalization harder. If you delete a field there, it's removed from every form, survey, and contact that used it, so clean up with care.
Well-mapped fields pay off later. Contact custom fields can be merged into texts, emails, and internal notifications, and you can use them to filter workflows or build Smart Lists.
Step 4: Configure the Form's Settings and Add It to Your Site
In the form builder, open these areas before you publish:
Styles & Options to adjust layout, colors, spacing, buttons, and themes so the form matches your site.
Notifications to set up an internal Email Notification to your team when someone submits, and an optional Auto Responder email to the person who filled out the form.
Post-submission behavior to show a thank-you message or send visitors to another page after they submit.
If your form will trigger automated follow-up, look at the form's spam protection options as well. MarTech offers CAPTCHA and email or phone validation to help reduce automated or invalid submissions.
When the form is ready, save it. Then click Integrate and choose how to share it: copy the embed code to place it on your website, or use the direct form link.
Step 5: Create a Workflow Triggered by the Form
Now connect the form to your pipeline with a workflow.
Go to Automation → Workflows.
Click + Create Workflow and choose Start from Scratch.
Click + Add New Trigger and select Form Submitted.
Click Add filter, choose Form is, and select the form you just built.

Click Save.
The Form is filter limits the workflow to that one form. If several forms should feed the same pipeline, such as a quote request form and a contact form, add more filters so each one triggers this workflow.
The trigger fires every time the form is submitted, including repeat submissions from the same person. Keep that in mind when you set up duplicate handling in the next step.
Step 6: Add the Create Opportunity Action
Click + below the trigger to add an action.
Choose Create Opportunity.
Fill in the settings below.
Click Save Action.

Here's what each setting does and what happens if you leave it blank:
Setting | What it does | If left blank |
Action Name | Labels this step in your workflow, e.g. "Create Opportunity – Quote Request" | Required |
Pipeline | The pipeline the new opportunity goes into | Required |
Pipeline Stage | The stage the opportunity starts in, e.g. "New Lead" | Uses the first stage in the pipeline |
Opportunity Name | The name shown on the opportunity | Uses the contact's name |
Opportunity Source | Where the lead came from, e.g. "Website quote form" | Stays empty |
Status | The opportunity's status | Set to Open |
Opportunity Value | The estimated deal value | Set to 0 |
Duplicate Opportunity | Whether a contact who already has an opportunity can get another one | On/off setting |
Name opportunities so they're easy to scan. You can build the name from the contact's details. For example, {{contact.first_name}} - Quote Request produces names like "Maria - Quote Request" on your pipeline board. If the contact has no first or last name, MarTech will try another identifier, such as their email.
Always fill in Opportunity Source. It's optional, but without it, the source stays empty, and you lose an easy way to see which forms and campaigns are producing deals.
Decide how to handle repeat submissions. The duplicate check is based on the contact, not the opportunity name:
Turn duplicates on if one customer can reasonably have several separate deals, such as a repeat client requesting a new project.
Turn duplicates off if each person should only have one open deal. When it's off and the same contact submits again, no new opportunity is created.
Opportunity ownership depends on your account's opportunity settings. Depending on how they're configured, the new opportunity may be assigned to the contact's owner or left unassigned.
In some accounts, you may also see an older combined action called Create/Update Opportunity. That action is being phased out for new workflows, so use Create Opportunity when you build this one.
Want an instant reply too? You can add Send SMS and Send Email actions to this same workflow so every new lead gets a text and email the moment they submit. Our speed-to-lead workflow guide walks through that setup step by step.
Step 7: Publish the Workflow
A workflow only runs once it's published.
Switch the toggle at the top right from Draft to Publish.
Click Save.
From now on, every submission of that form creates an opportunity in the pipeline and stage you selected.
Step 8: Test the Whole Process
Test with a real submission before you send traffic to the form. Use a made-up name, an email address, and a phone number that aren't already in your contacts.
Submit the live form. Open the page where it's embedded, or use the direct form link, and fill it out with your test details.
Check the confirmation. Make sure your thank-you message appears or the redirect sends you to the right page.
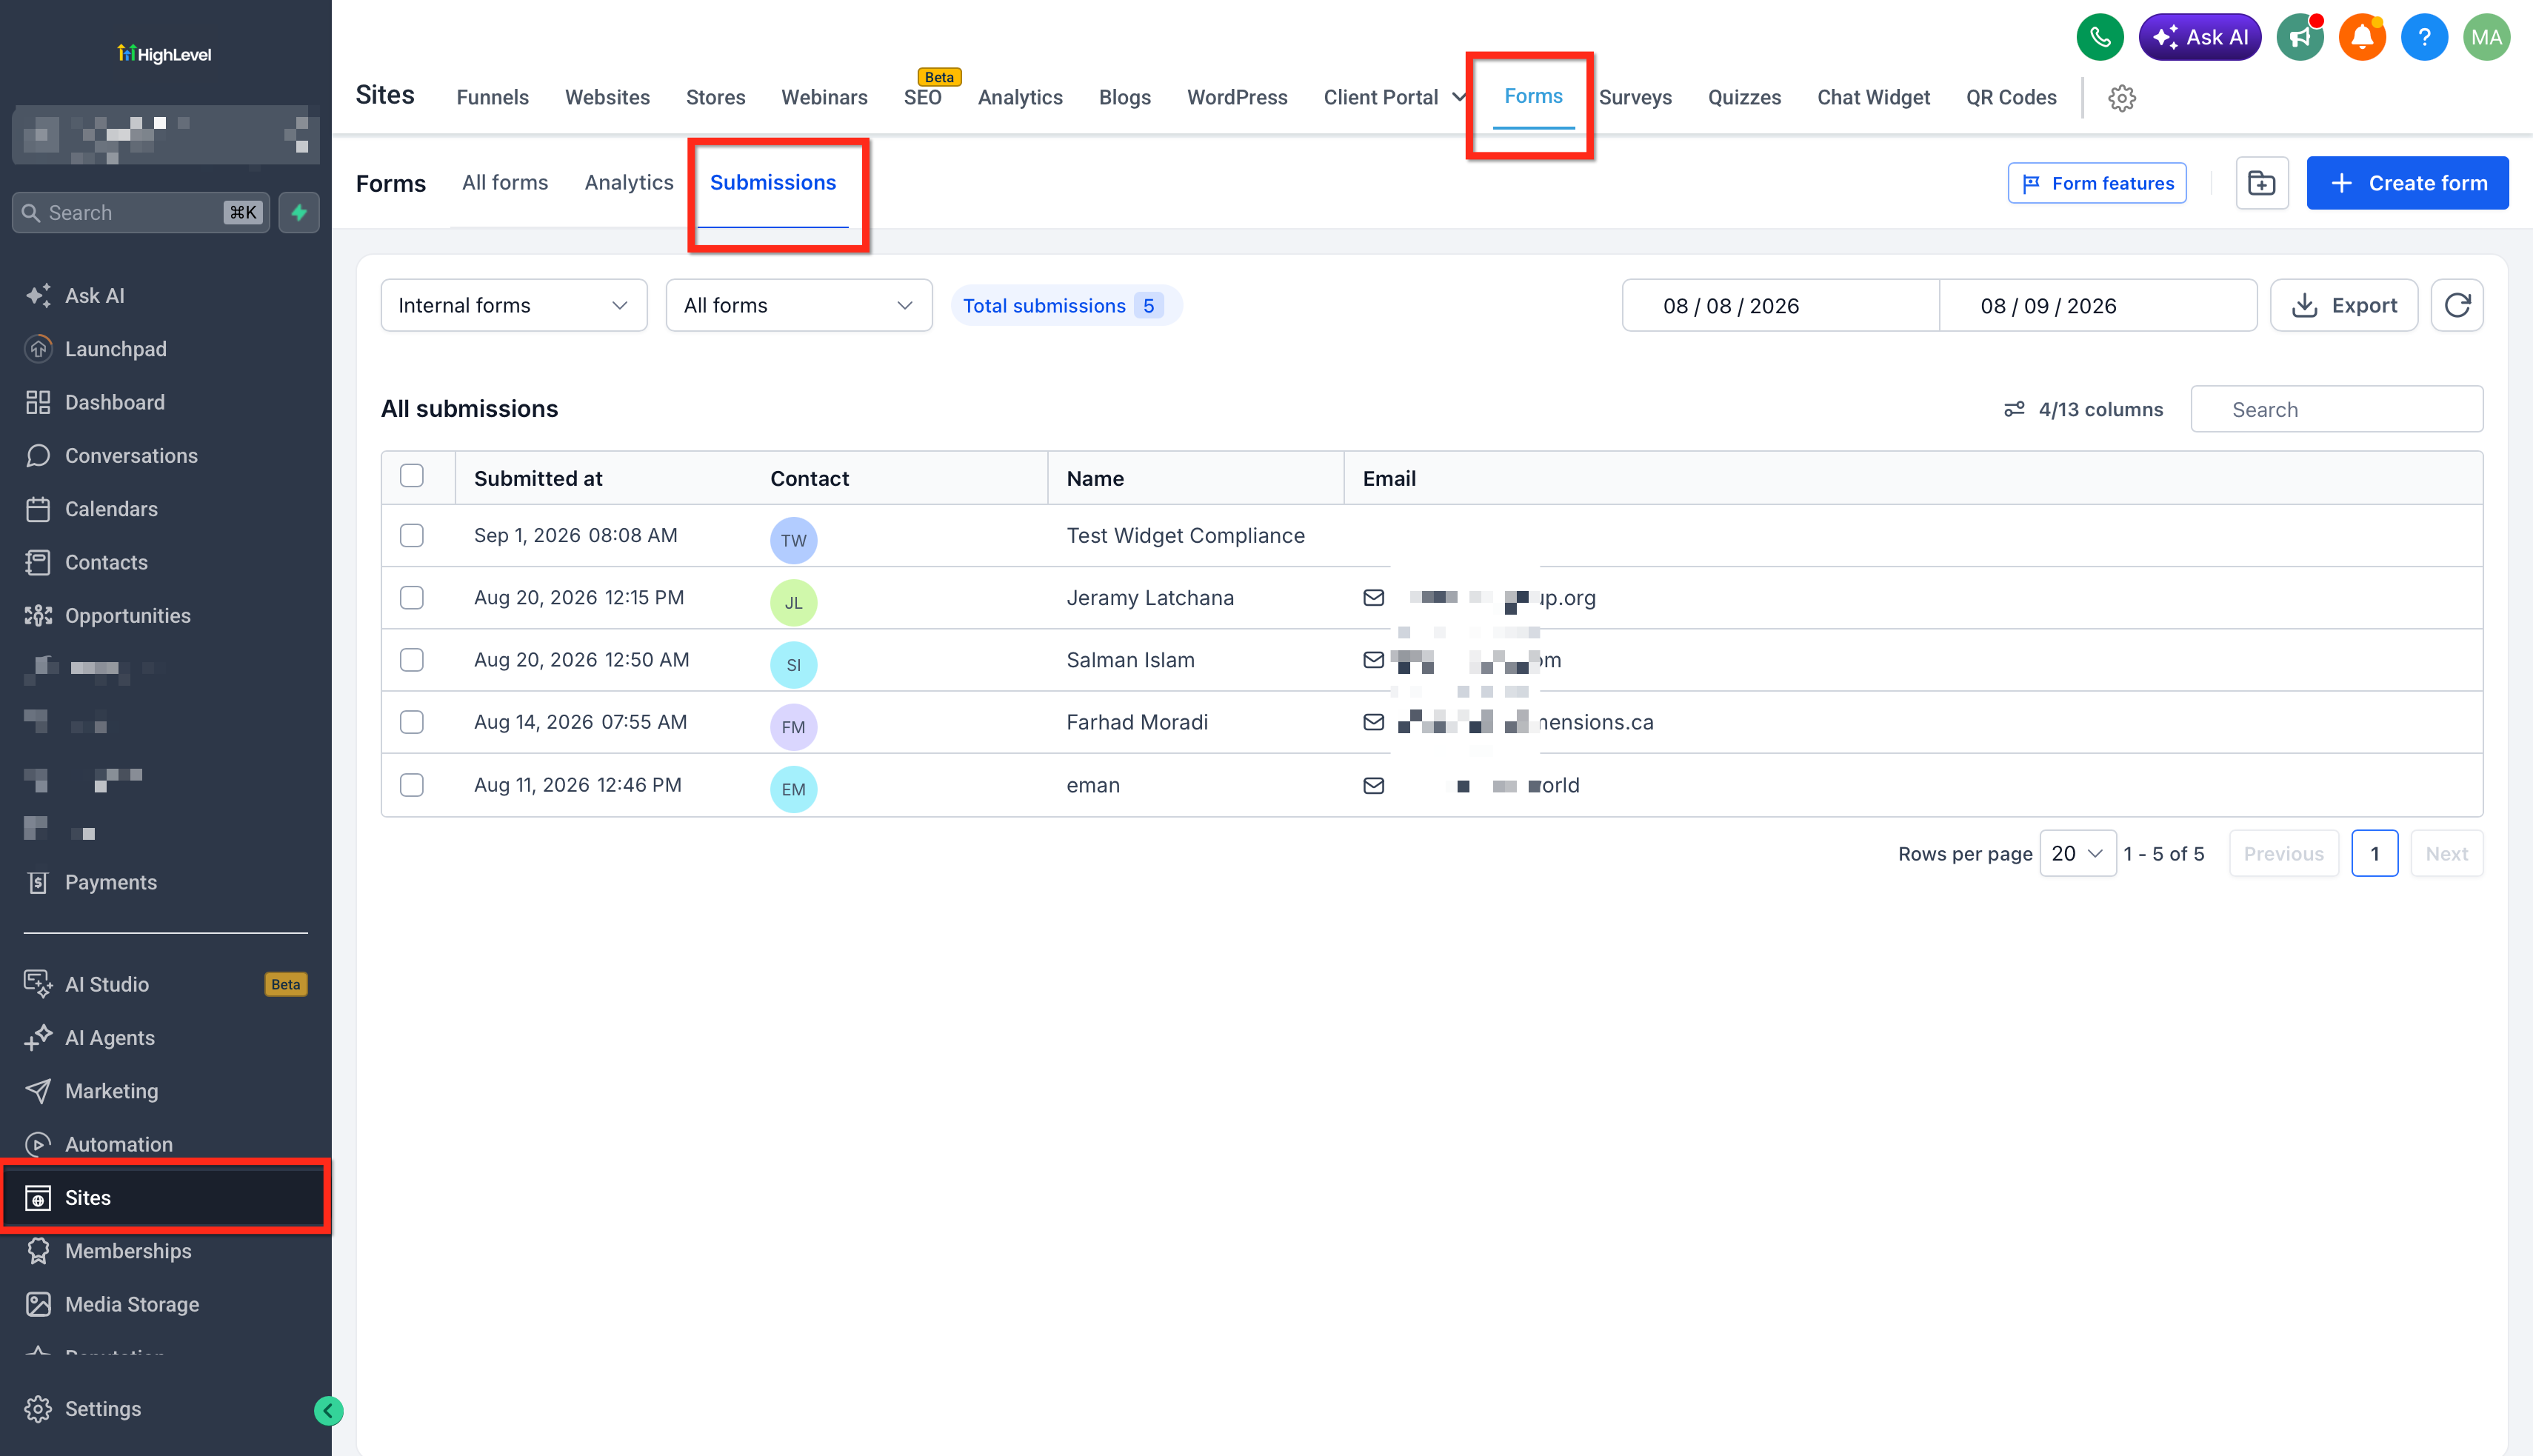
Check the submission. Go to Sites → Forms, open the form, and click the Submissions tab. Your test entry should be listed with every answer you gave.
Check the contact record. Find the test contact and confirm each answer landed in the right field, including your custom fields.
Check the pipeline. Go to Opportunities, select your pipeline, and confirm the new opportunity is in the right stage with the name, source, and status you set.
Test a repeat submission. Submit the form again with the same details. If you turned duplicates off, no second opportunity should appear. If you turned them on, you should see a second one.
When you're done, delete or clearly label your test contacts and opportunities so they don't skew your pipeline reports.
If the opportunity doesn't appear, check these in order:
The workflow is published, not still in Draft.
The trigger filter points to the right form.
The Create Opportunity action has the correct pipeline and stage selected.
Your test contact didn't already have an opportunity while duplicates were turned off.
The workflow's execution history doesn't show a skipped or failed step.
If you see duplicate contacts rather than duplicate opportunities, review your account's contact deduplication preferences. How repeat submissions are matched to existing contacts depends on those settings.
Once the form is live, the Analytics tab in the form builder shows views, responses, average completion time, and completion rate, so you can spot a form that gets traffic but few submissions.
Examples
The setup is the same in every case. What changes is the form fields, the stage, and the duplicate setting.
A landscaping company uses a "Request a Quote" form with a Service Needed dropdown (lawn care, design, cleanup). The workflow creates {{contact.first_name}} - Quote Request in the Sales pipeline's New Lead stage, with source "Website quote form." Duplicates are on, because returning customers often request new projects.
An accounting firm uses a "Book a Consultation" form that asks about business type and the help needed. Opportunities land in a "Consultation Requested" stage. Duplicates are off, so a prospect who submits twice doesn't clutter the pipeline.
A corporate training company uses separate forms for group training and one-on-one coaching. Each form has its own workflow, and each Create Opportunity action uses a different Opportunity Source, so the team can see which offer generates more deals.
Wrapping Up
A lead capture form becomes far more useful once it feeds your pipeline directly. Build the form with only the fields you need, make sure each one saves to the right contact field, then add a Form Submitted workflow with a Create Opportunity action pointed at the right pipeline and stage. Publish it, run one full test, and every new inquiry shows up as a deal your team can act on.
Want to see MarTech in action? Book a live demo

HOW MUCH IS IT?
Our monthly subscription is just $249*, providing you with unlimited access to all features and support without any hidden fees. Try it FREE for 7 days!
Enjoy the flexibility to cancel or upgrade your subscription at any time, ensuring you get the most value out of your investment in comprehensive digital marketing support and cutting-edge technology.
*Some features have usage-based fees - learn about them here.
WATCH NOW
Unlimited Digital Marketing
Marketing Automation Workshop Replay
Learn how our software can help you start nurturing your prospects and grow your business from the top of the funnel to the bottom line.
In this video you’ll learn:
Easy ways to organize your contacts and communicate better.
Simple methods for creating and handling social media posts.
Time-saving automation to make nurturing leads easier.
Ways to manage reviews and boost your company's reputation.
TAKE THE NEXT STEP TOWARDS DIGITAL MARKETING SUCCESS
Ready to revolutionize your marketing efforts?
Fill out the form below to access unlimited support, cutting-edge technology, and expert guidance.
Get started today for $249/mo or $2,490/yr with a FREE 7-day trial.
Additional Resources
Authority Blueprint
In this highly personalized process, we create an optimized LinkedIn marketing strategy for you, optimize your LinkedIn profile, and produce a calendar of content ideas for you to update your LinkedIn on a daily basis—complete with copy to get you started!
evyAI LinkedIn Assistant
Enhance your LinkedIn™ presence with evyAI,
a Chrome extension and a web app that supports your LinkedIn™ activities.
Create Personas, generate ideas, craft posts and 10x your LinkedIn™ exposure and productivity.
Monthly Strategy Session
Join our free monthly strategy session to get expert feedback on your current B2B marketing approach. Learn actionable ways to attract more leads and generate high-quality referrals.